Tuesday, 12 July 2011

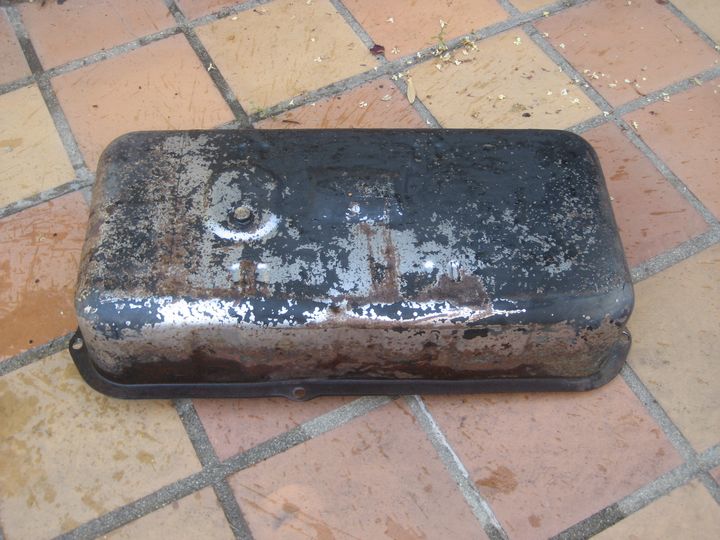
Fuel tank assembly and some strip down

The fuel tank was finally ready with a gorgeous new looking paint coat. I could clearly see my face reflected in the paint. Using those sponge brushed was a great idea, and they are worth every cent.


I fitted all the rubber mounts, and the fuel neck foam. Also I sanded the gasket surface of the fuel sender and install it with a new gasket. I did not use any sealing paste, as usually the cork gasket should be enough for a good sealing, but I am worried that in the near future I have to take down the fuel tank and fit a new gasket the that colour sealing  paste.

The fuel neck originally was nor painted, it was just a metal tube with some king of zinc coating and finish, that was starting to have some light corrosion in some places. So I sanded all the tube and gave a coat of a standard zinc spray.

The fuel cap is the original, and the chrome is just in perfect condition. The key cap protector was very hard, so I just lubricated it.

Ahhh, Of course I cleaned the metal spade of the fuel tank sender, to ensure perfect contact. A dremel with the small wire wheel is the perfect handy tool for this jobs.

I removed boot tail lights that where in a very poor state. Some cracks on the plastic lights and dry glue and lot of dirt on the chrome parts. The boot had several used original Lucas and Unipart plastic lights, so I choose the best ones, to make new tail light assemblies, and cleaned with solvent the chrome parts and finally used some magic cotton. Fitted new gaskets as the original ones where dry and cracked. Finally the right light assembly could be restores to possibly  95% original condition, with the chrome parts nearly perfect. The left one could reach only 60% of originality, because the chrome has some pitting and marks I am not able to remove with the magic cotton. Anyway, I will need to polish all the plastic lights to restore the colour.

Original situation
 
Inside

Chrome full of glue


I also found on the boot a used original spare SU fuel pump. The one installed in the car is working, so I will leave it there for the moment and will not touch it, so I can concentrate on other important things, unless it suddenly fails. But I have strip down the spare pump as I was thinking in ordering a new rebuild kit. I opened the pump and removed every parts. Found some dirt on the fuel filter, and all the rubbers where completely dry and perished. Meanwhile, I will clean the metal body to remove rust and paint it, and clean the aluminum top with the sand blast. Then I will think when I order that rebuild kit, as I am trying to give priority to the most important parts and taks for time and economy reasons. Just wondering if when I order the rebuild kit, I just stay with the original contact system, or I should update to the newer electronic system. This car will be used not daily, but weekly all year round, so should not suffer from points corrosion found on cars that are stored all the winter. Money will tell me what to do......


Saturday, 9 July 2011

Fuel tank finish and some chrome cleaning

Today I had some time to finish painting the fuel tank as last weekend I only had the time to paint one side.

The paint I am using, por15, is getting a little bit too dense, so I needed to add some solvent for thinning the paint. So I got from ACM Restauración a solvent bottle, specially formulated for all por15 products. I didn't want to use an universal solvent, just in case it had any issue with this special paint. I also got 2 sponge brushes, which I really wanted to try after reading they give the best result, nearly as a spray finish. ACM is the sole spanish por15 provider. Their prices are almost the same as other retailers in Europe, but with the bonus of no international shipping costs.


So first I have a light 400 grit sanding to the paint I gave last week, and gave the first coat to the other side and 2 hours later a second coat to all the fuel tank. Tomorrow it should be dry and will fit all the rubber parts, fuel sender with new gasket and install it into the car.

Just wanted to comment how happy I am with the sponge brushes. They are awesome, and give such a nice and very fine glossy finish. See the next video and you will understand:


Next I moved to my right side lamp. Some time in the past, the glass was broken, and someone with great ideas, instead of fitting a new glass, he fitted a hard plastic film, glued and painted to the chrome bezel


Just in case, I ordered from Moss a complete flasher unit, a reproduction unit made in these days. Quality is good, specially for the glass and the rear holder. But the new chrome bezel has a very poor fitting, and sides are very poorly finished and may cut your hand if you are not careful.


So I thought about re-using the original chrome bezel which looked to be in very poor condition.


But ........ after cleaning first with solvent to remove the old glue and silver paint, and some magic cotton used to clean silver and other metals, I ended with an almost new chrome bezel. It is incredible to see the quality of these old chrome parts, which is fantastic. Fitting is perfect, and finish is great. Of course the original rear bulb holder, I will keep it in my original bits box.


Sunday, 3 July 2011

Painting all day long!


This has been a weekend of painting work.

The original situation was a solid fuel tank, with very little inside surface pitting, so I decided to reuse it. Last post I mentioned how I cleaned the inside, so now it's time for the out side


Using a angle grinder with a wire wheel, I removed all the rust and old paint and debris. It is a slow progress, loud and unpleasant..... working at 4pm in summer in Spain, makes the angle grinder get really hot, so hot, that I had to stop from time to time as I really could not hold it (I had no gloves). Wearing a mask is a good idea as rust dust is not nice to breath. Of course, it's necessary, lets say mandatory to wear goggles for your eyes. You don't want to imagine what a wire that is spinning at 10.000rpm, can do if it hits your eyes... but if you want to know, just click.


After some two hours of work I finally ended cleaning the fuel tank. It is very important to clean throughly the metal surface to get the best key for the paint. I first used a sanding sponge, that I have to say are great. They are very cheap, and easy to work with and adapts very nicely to all surfaces. I used a course sponge and finally cleaned all the surface with clean rugs and white spirit.


To paint the fuel tank I used POR15 black paint, which should give a very tough and hard finish. In my case, the two metal halfs of the tank, where separated in some areas, although the weldings are in perfect condition. Such gaps can head to rust do to water and mud getting trapped. So I took great care to get the paint inside to encapsulate the gap.


Final result is great, better than new!


Following, I moved on to the wire wheels. I used a fine sanding sponge, about 250, to remove all the dust that the primer had. When finished, I cleaned them with water, and let them dry. I used 2 can for the four wheels. It was just enough, but I think a third can would be better to give a thicker layer of paint. It was just enough for two thin layers.


I used a special wheel paint made by DupliColor called CAR'S. This paint has very positive posts on restoration forums, but it's not cheap, about 14 eur per can. I have the doubt if I should give a coat of clear lacquer on top. The specialist at the auto paint shop told me not to use it. His customer usually don't use it, and have never had any issues.


Two or three days to fully cure, and then I will take them to the wheel shop to fit new protection bands, new tubes and new tyres.

Thursday, 30 June 2011

First parcel and wire wheels


It's Christmas time!!!!  I love it, arriving home and finding such a huge parcel waiting for me! ja ja


It's my first order from Moss. It has all the parts to rebuild completely the braking system, the suspension, maintenance, and plenty of small parts to rebuild the car. There is also a stainless steel exhaust system. Sadly, there are some important parts such as front brake disks on back order, and I wont receive them until 2 weeks time more or less. That means that I have to wait until then to take the car to the mechanic.


Finally I decided to order a new brake master cylinder. Using the original one was too risky due to the poor state of the bore walls, and I really wanted to have the best braking system the car may have. I made several phone call to different providers, and found that Moss had the correct 3/4 bore master cylinder I needed (front drum cars will use 7/8 bore, and front brake disk cars will use 3/4 bore), at a very competitive pricer. And specially, as I still have some parts from my order in back order, they will send it to me at no extra shipping cost, great!


I also received the 4 wire wheels after sending them to professionally sand blast. The result is extraordinary! After sand blasting and removing all the paint and every trace of rust, they gave 2 coats of phosphate primer. The work was done by the company Kira Klaus in Burgos-Spain, which specializes in all kind of professional sand blasting (from small parts to industrial machinery). Their tel is 646768576 if someone is interested. Now I still have to sand the wheels with some 400 grit sand paper before painting them. I will be using a silver wheel paint made by DupliColor, which has a very good quality based on my readings in several international forums.

Original condition of two of the wire wheels

Wire wheels after sand blasting and phosphate primer


Looking forward to work this weekend, where hopefully I will do the following:

-use the grinder to remove all the paint and rust from the outside of the fuel tank plus painting using Por15

-sand and paint the 4 wheels

Monday, 27 June 2011

Master Cylinder overhaul

Most important thing for security and MOT test, is having a strong a perfect brake system. So I have ordered most of it's components new from Moss: hoses, slave cylinders, drums, pads, disks, etc.... except for the brake master cylinder, which is a little bit special, as it has a dual function actuating as brake and clutch system. This master cyl is very expensive item when new, about 250 eur, so I ordered a rebuild kit with all the rubber parts and seals. Yesterday I completely dismantled the cyl, and found plenty of an ugly and gummy brown brake fluid, which said nothing good about it's situation.


After cleaning, cleaning, and more cleaning, I covered all the intakes with some painters tape so I could scratch the outer surface, to finally paint it with por-15.


And now comes the problem: after a close examination of the two bores, the internal surface is in a very poor situation, pitted and rusted. Therefore I am terribly worried about what to do. Inserting new rubber parts may solve the situation for some time, but I am sure that the poor state of the internal surface will finally damage again rubber parts finding my self with a broken master cylinder in a short period of time. Apart from that, my personal safety (and copilots safety) is priority, and I dont feel comfortable in this situation.


I have been gloogling a little bit and found a USA company called Sierra Specialty Automotive, that will re-bore and fit a new sleeve, thus making a complete new cylinder. After reading some blogs and personal pages, they have a very good reputation. Problem is cost, at nearly $200 is not cheap, and not only that, sending a master cyl to the States can cost up to 30-35 eur, and way back. Yes, shipping costs from Spain to the resto of the world is incredible expensive. It costs more to send a letter from Spain to Spain, than ordering a part from the UK to Spain.... So I need to make some numbers, and search for new ones if possible in Europe. First call in the morning tomorrow monday will be to Moss, and hopefully if they have not yet send my parcel, y can add a new cyl and combine shipping costs. That's of course if they have new cylinders and at a reasonable price.....

Friday, 24 June 2011

Fuel tank cleaning and wheels restoration

Progress is slow....

Some days ago, I removed the 4 wheels and went to the wheel shop that will be fitting new tyres and tubes. Finding in Madrid a wheel shop that has previously worked with wire wheels has not been an easy task. Looks like it´s a black art nowadays. Plenty of phone calls, until a friend told me to call a shop outside Madrid. I called the manager Pedro, who confirmed that they had all the necessary equipment and special cones to correctly balance wire wheels. They have several customers with wire wheel classic cars. The company name if anyone is interested is Aguilera e Hijos.

Original wire wheels looked to be in good condition, so we removed the original 145 Michelin radial tyres, dated 1998. Once the tyres and tubes where removed, I found that most of the spoke heads where rusted, so then realized that the best option would be to professionally sand blast them, as using my hobby cabinet would be slow and I will really destroy most of my blast material, which is so expensive. So I gave them a quick clean, and gave them to a person who will in theory tomorrow, sand blast them. He will also apply a primer, and I will paint them with a special rim silver spray paint.


I am concerned, that when the tubes where removed, I only found a protection band in the center spoke head circle, but not on the lateral ones. The only image I have found on internet of a wire wheel with the protection band, will show two of them. I need to verify is only one is necessary, or I need two.

Two days ago, I made a huge parts order to Moss Europe. Mostly all the necessary part to completely rebuild brakes, suspension, filter, hoses, lights, and plenty of new gaskets, grommets, seals, bolts and nuts, to pass the MOT and make the engine run again. I was aware of the existence of the company MOSS, but I had never made an order from them. After verifying they have a vast stock of parts (even the last bolt), reading good references, and verifying the prices where good or better that others, I made the first of my future orders. The huge parcel should be arriving next week, i'm so excited about it!!!!


Today I made a small weekend project, and removed the fuel tank. As the car was with jack stands because I have removed the 4 wheels, I had a great opportunity to do so, and the access to the fuel tank was fantastic. I first used my trusty Kartcher to clean it and the surrounding to have a better handling. First unbolted the fuel line (yes, it is bolted as if it was a brake line into a brake cylinder). Then removed the 6 nuts that hold the tank to the underbody, and finally removed the fuel neck inside the boot. What I found was an original fuel tank, with plenty of surface rust, and some areas with the original paint. 


I cleaned the fuel tank with the Kartcher, and then removed the fuel sender units, total of 6 small bolts. The inside of the tank looks to be in very good condition, some small rust pitting, and some deposits of years of use. My technique to clean fuel tanks is always the same: I filled the tanks with about 1 kg of very small tones, like the ones used in fish tanks for home use, and then with high pressure water I move them inside the tank. Today I have used the Kartcher with the 90º angle tip, that makes the stones scratch all the inside surface. Others have used chains from a chain saw, with some water and shake for some minutes. I´m sure it's a good option also. I know many people would just buy a new fuel tank, as they are cheap, but I believe to try maintain most of the original parts when it´s possible and restore them. Buying new parts is always possible and easy, you only need money. But restoring a car for me is not buying all new parts, the funny thing is to restore as much as possible. For me a classic car made out of all new parts, has nothing special.


Next week I will use a wire wheel to clean all the surface, and paint it. I will use POR-15 black paint which should give a great shine and paint durability.

This weekend I will be cleaning some parts with the sand blast machine and paint them. Will post some updates then.

Tuesday, 14 June 2011

Work starts


Yes, work starts, and what a better way to start working than making a great barbecue with the family?


I started with the left floor pan. The metal is in great condition, but had several surface rust spots. Also, the floor pan was covered with anti chip material that in most places was starting to peel off. I think the paint and anti chip was original, as the metal was covered with a red primer that I can see all over the car, then a layer of antichip, and then all painted Riviera Blue.


In this photo you can appreciate the original state of the floor pan. As I said, the metal was very sound, but I thought a little bit of cosmetical work would be nice.


Next I scrapped all the paint and antichip with a spatula, and finally used a very coarse grinding paper. I removed the hole plugs. After cleaning the metal with some solvent, I gave the fist of two layers of primer. Once again I have been using the Dupli-Color primer which should give a good result. 


Once the primer was dry, I was ready to apply the Riviera Blue colour, that my paint shop prepared specially for me in a spray can. All of the paint materials I buy them at Gosan in Madrid, a shop where auto specialists use to buy. The spray paint they prepared, is top quality. This special spray cans are specially made for cars, because the nozzle has a special patern and will make a fine horizontal spray, rather than a circular spray patern found in common spray cans. I gave two coats of colour.

Final result was superb, but had to go home so could not see final result once completely dry. But so far, so good!

Next week end, I plant to paint the right hand floor pan. But the interesting thing is that I am planing to use POR-15 as a base coat and apply it over the bare metal. Then I would sand it, apply the primer, and then the blue colour. I have a POR15 can that I got from Holden & Vintage when they used to come to the Retromobile anual show at Madrid, so I was not paying the shipping cost. I am seriously thinking in applying POR15 to many parts, as the more I read and see YouTube videos about it, I am more convinced about it's great quality to treat and prevent rust. I need to search for local shops where I can buy it to reduce shipping costs.

I have seen at YouTube a video of Chris from VW Classic Bugs where he has completely covered the underside of the care just with POR15 and the job looked superb! But first I have to finish all the mechanical side of the car, pass the MOT test and lots of other important jobs.

Wednesday, 8 June 2011

Imperial nuts!!!

Well, some days ago, I was removing some nuts and bolts from the pedal box assembly, and thought the bolt was a 11 size spanner. But looked to be small, so used a 12 size spanner, and it was big..... hummmm, there's something strange..... aha!! the bolts are in imperial size!!! so I had a huge problem, as all my tool box is from the normal size of the world ;-)

So I ended up making a quick search on ebay and found quite few spanner sets. Some where very expensive, and as I am on a budget, I got a Draper set (seller name: mccormick tools UK) and Silverline set (seller name: spanner2hammer.co.uk)

Fortunately the sets where cheap at £16 the Drapper set and £3 for the silverline set. I am sure the quality is not the same as those £100 sets i've seen, but should be ok, I hope....

Now I can remove all the bolts without worrying about damaging the bolts heads.

Tuesday, 7 June 2011

Finally I only had the time to sand blast one of the parts. It's really amazing how easy and the results I can obtain with that machine. How can I have been so many years without a sand blasting machine? It´s not too big, but the size I wanted cost about twice. I think it could handle even a 10 inch Mini rim. Although my compressor has a small tank, the work was fast, I think it took me about 20 minutes to make it. The result is a nice metal part, with no corrosion or paint and a perfect surface that should give a good key for the primer.


I cleaned the surface with a rag and alcohol to remove any dirt or dust, as I didn't have any special liquid like the ones used in professional paint workshops. I sprayed two coats of primer, giving about 20 minutes between each coat. The primer I am using is made by dupli-color. As these kind of parts I'm painting them in the kitchen (shhh, dont tell my wife!), I'm unable to use a 2 pack epoxy primer. I really wish I had the space to do it, as that kind of primer is the best one I could ever use. But in my situation I needed to find a good primer on a spray can. The paint shop told me the dupli-color primer was the best one I could get. Also they told me that I always need to put the best primer I can get, and then I can use the same or a lower quality paint. But never a low quality primer + good quality paint as the paint will always tend to remove the primer. I will possibly buy the dupli-color sating black for the top coat of paint.

Friday, 27 May 2011

Some orders and some parts dismantling

I love arriving home and finding some big parcel has just arrive.... it's like Christmas time!!! last week I made some buying on ebay, and found an original MK2 and MK3 workshop manual. Getting hold of original manuals is cool, and it's a great add to those Autobook's or Haynes manuals we all have. I also found a new and original bonnet hinge, that of course I bought it immediately. Original parts are always best than reproductions made today...


I took some time today to dismantle some parts that I would like to restore this weekend with the help of my new toy, a shot blasting cabinet. I will remove all the paint and rust, and give a perfect key for a new primer coat and some black paint. The air filter housing, the pedal box assembly plus the master cylinder, and the pedal box cover.


Monday, 23 May 2011

Front wheels removal and bonnet hinges

All four wheels need new tyres and tubes. I will be changing them 2 by 2. So I removed first the front ones. This was the first time I found my self in front of wire wheels, and although I love them in this classic brit sporty cars, I always look at them with respect. Why? only one big nut that  hold them, maintenance, and finding someone in my city that knows how to work with them....

Jacked up the car with the original jack, which worked quite well and nice. Hold the lead hammer, and with 3 knock on the knock-off ear, I could remove it easily. Remove the wire wheel, so I could have time to check the so important splines. They look to be in very good condition, based on what I found in two very interesting articles which I highly recommend to anyone working with wire wheels:
1- http://www.them-g-c.com/index_files/Page1655.htm
2- http://classicmotorsports.net/articles/wire-wheels-classic-cars/

The splines look good with no apparent damage as you can see in the image. Need to clean off the old grease, and put new one.


Now I will take the opportunity to use my handy kartcher and give a good clean to all the weel arch, the suspension, hub, etc.


So far I have found 2 shops in Madrid that in theory are capable of working with wire wheels. I will call both again, and see which one convince me, and will take him the front wheels for tyre and tube change, cleaning, painting and balancing.

Finally, I removed the bonnet, 8 screws, and that's it. Be careful because its big and heavy. 2 more hands are always best, but today was not my case, as always, I am on my own. I wanted to remove the bonnet hinges, as the bonnet was not leveled and scratching the bulkhead. I thought one of the hinges, the left one, was damaged because the bonnet was lowered in this side.


I started removing the right hinge, which I have to say was difficult. Needed to remove the facia panel enough to use the spanner. See the image to imagine how difficult it's to remove it.


Once I removed the large bolt, I could find that the hinge, apart from being heavily rusted, was broken in the sides, so I would scrap it.

Moving in to the left hinge, problems began.... I removed the bolt nut, but the bolt is seized and wont come out. Not because it's stuck to the soldered nut in the body, but cause the bolt must be seized inside the bonnet hinge.... I suppose it must be rusted, and I really cant remove it. Now, my main problem is that the bolt head is worn after many attempts of removing it. I have used liberally amounts of WD40, but nothing. What should I do? how can I remove such difficult bolt in such awkward space? Any idea?


Thursday, 19 May 2011

Found the original keys!


Lady X has finally found deep in her house the original keys of the car. The ones I had where just a copy. Lovely old keys, with patina and history... just need to find a nice Austin key fob

Monday, 16 May 2011

Cleaning, and cleaning and cleaning...

There's nothing more uncomfortable than working in a dirty car, full of oil, mud and years of dry oil and debris.

So I first made an exterior clean up, to remove all the dust and contamination of 16 years in a garage with heavy traffic.


I then continued with an underside clean up. I used a kartcher pressure machine with a special 90º angle tip, that makes cleaning very easy as pressure water can be directed in all directions. Plenty of mud and grease was removed. I made my best to clean wheel arches, rear axel, front suspension, etc. I then opened the bonnet and cleaned the engine and engine bay. Now the engine looks much better.


Finally, I cleaned interior, which was pretty well, with just a thin coat of dust.

A close up inspection removing the floor carpets revealed no corrosion on the floor pans and the car looks to be structurally sound.


The boot contained several surprises..... some original tools as the lead hammer, a tonneau cover with it´s tube sticks, etc....


Now it´s time to go, and wait until next weekend to continue...... see you soon!

Saturday, 14 May 2011

The rescue!

Finally, the moment arrived..... it was time to rescue the car from the dark garage, and take it to a better place, where I will restore it.

Some days before, I made a visit to the car to put some air pressure on the wheels. After nearly 16 years in that position, wheels had been distorted. With the aid of a small compressor, I could inflate them to the point where it would be possible to tow out the car. Incredibly, the wheels kept the air pressure.


Saturday, 7 May 2011

First start and close inspection

Just before we made the final agreement on the price, I needed to be sure the engine was in running condition, so I needed to run it.

As the engine has been without running for more than 16 years, 3 days before I removed the spark plugs and added huge amounts of very thin oil. Also verified there was engine oil, and added coolant.

The day i made it run, I first connected an external battery (discovered the car is positive earth), removed the air filters and with a syringe, I added some fuel to the carburetors air inlets. Insert the key, turn it and the engine would fire nearly instantly.

So I poured 2 liters of fuel in the fuel tank and started the engine during about 2 minuted to hear the sound and find if something was wrong. Everything  seamed to be ok, no strange noises or vibrations. Stopped the engine because I didn't want it to be much time running with such an old oil.